Bloggers

What are those?
A blogger is a tool that lets you build a blog, ie. a web log. A web log is a kind of diary, with a list of entries. Examples of those are Slashdot or Scripting News. The advantage of using a blogger instead of adding articles by hand, is that contents and displays are neatly kept separate (eg. the article itself doesn't include a header and footer, which will be added automatically by the blogger when the article is displayed), and it's a hell of a lot easier to manage a site where more than one person contributes. Just imagine the nightmare it is when a whole team needs to add articles to an intranet, and you'll start to understand the whole point of using bloggers like Zope, Midgard, Manila, or OpenCMS.
Some applications save articles as flat files, while others rely on a DBMS. To the exception of CityDesk, and, to a lesser extent Radio, all applications require your building an Apache with mod_perl or PHP built in, and support for a DBMS like MySQL or Postgresl. Therefore, it is recommended that you check the Updates section on the web site of the company for your distribution (eg. http://www.redhat.com/apps/support/updates.html for RedHat), and upgrade GCC if you fail compiling some modules. Incidenly, GCC 2.96-81 would segfault when building MySQL 3.23.37, but proceeded OK after upgrading it to 2.96-85.
I recommended building MySQL from scratch instead of installing RPMs, because PHP expects to find all MySQL files in a standard tree below a single mount point (eg. /usr/local/mysql/), while RPMs often install MySQL files in different areas.
Personally, I think CityDesk is the way to go, ie. providing a WYSIWYG dedicated client is a much better solution: While a web browser is great to read documents, we're a long way to having an interface that matches a real word-processor. Through its DHTML widget, Internet Explorer does provide some basic formating such as bold or italics, but it's nothing like the word-processor people are used to working with. Besides, no tool provides support for disconnected mode, ie. letting users work on a site on a laptop while on the road, and synchronize this work with a server once they're back at the office. If you really need this feature, you're stuck with proprietary tools like Lotus Notes, MS Exchange, or Novell Groupwise. Finally, web-based editing sucks because it doesn't provide Save as Draft, ie. if the browser GPF's while your editing, you'll lose all the work you did unless you remembered to copy/paste it into an other window. Been there, done that. Grrrr....
Important items when choosing a CMS
- Total separation between content and layout (editing an item should not include any layout-info)
- Easy editing for non-techies (web browser = yuck)
- Preferably OS-independent tool (PHP, etc.)
- Basic workflow (eg. content should be validated by manager before being visible on live site)
- Support for different viewing modes (screen, print)
TextPattern
- http://www.textpattern.com
- PHP + MySQL
- Written by Dean Allan, author of the blog Textism
BlockNote
- BlockNote, a embeddable HTML editor currently under development
BlogMan
- a.k.a. Blog by Fahim A. Farook
CornSharp
- CornSharp by Eric Sink
- Requires the .Net framework
- Desktop blogging tool, no database required
Typo3
HTMLDoc
Open-source tool to turn independent HTML documents into either a big, indexed HTML file, PDF, or PS files. Available from Easy Software Products
phpBB
- PHP-based, open-source discussion tool.
- Don't like FUDforum? Give phpBB a try
b2
Tinderbox
http://www.eastgate.com/Tinderbox/
Movable Type
MT is a pretty neat blogger based on a bunch of Perl CGI scripts, and saves entries and archives into flat files with additional index files for extra performance. Several extra Perl modules are required. from Should you have any problem, first read the Installation Instructions and the User Manual available on the MoveableType web site, along with the archives of the support forums available on the site.
Required Perl modules
- File::Temp
- SOAP::Lite
- LWP::UserAgent (part of libwww-perl and URI packages)
- CGI::Cookie
- DB_File
- File::Spec
- Image::Size
- HTML::Template
NT Setup
- Install ActivePerl
- Untar the MT package into your web server's CGI sub-directory, eg. http://linux.acme.com/cgi-bin/mt/.
Note: If using FTP, the scripts and configuration files must be uploaded in ASCII mode, while images must be uploaded in binary mode
- Move the style.css and sub-directories docs/ and images/ in a different directory, outside the cgi-bin/ directory, eg. C:\www\htdocs\
- Under the directory where MT is now installed in the CGI directory, create a sub-directory extlib/, followed by extlib/HTML/ (eg. C:\www\cgi-bin\mt\extlib\HTML\)
- Still under the MT CGI-BIN directory, create a sub-directory cgi-bin/mt/db/ (safer to move it out of reach of the Web server process?)
- Open each .cgi file in a text, and change the shebang line from "#!/usr/bin/perl -w" to eg. "C:\Progra~1\Perl\bin\perl -w" (or wherever you decided to install ActivePerl)
- Open a DOS box, and run "ppm query" to check which Perl modules
are installed with ActivePerl. Download those missing (ActivePerl
packages and tar balls), and run "ppm
install mymodule" to install those not currently installed.
Note: ActivePerl 5.6.1 comes with HTML-Template 1.8, while MoveableType requires HTML-Template 2.0 and newer. Unless you're lucky and find an ActivePerl HTML-Template newer than the 1.8 that ships with Perl 5.6.1, just download the regular, non-ActivePerl package from http://search.cpan.org/Catalog/World_Wide_Web/HTML/ , untar the package, and copy the Template.pm file it contains into the extlib/HTML/ sub-directory created above
- Run "http://linux.acme.com/cgi-bin/mt/mt-check.cgi"
to have MT check if you have all the required Perl modules correctly installed.
- Edit mt.cfg to change...
- CGIPath to eg. "http://linux.acme.com/cgi-bin/mt/", including a final "/"
- DataSource to eg. "c:\www\cgi-bin\mt\db" (WITHOUT the quotes!),
- StaticWebPath to eg. "/mt/" (again, WITHOUT the quotes, and remember to remove the leading # character that is used to comment this line out; This is part of the URL, and NOT the location in your filesystem)
- Run http://linux.acme.com/cgi-bin/mt/mt-load.cgi . Once it's done running successfully, delete mt-load.cgi ("FAILURE TO DELETE mt-load.cgi INTRODUCES A MAJOR SECURITY RISK.")
- Aim at http://linux.acme.com/cgi-bin/mt/mt.cgi , log on as Melody/Nelson. Remember to change this default login/password combo
- To view the dummy "First Blog" blog, click on (duh) FIRST
BLOG, followed by EDIT BLOG CONFIGURATION, and edit the file paths and URLs
where this blog and its archives should be located. If you want archives
to be created in a new sub-directory under htdocs/, eg. C:\www\htdocs\mt\archives\, make
sure you create it beforehand as MT won't create it automatically.
Important: Remember to add a trailing "/" (without the quotes) when setting the path to where the archives of this blog will be located (eg. C:\www\mt\archives\). - Scroll down, and hit SAVE, followed by a click on REBUILD at the top
of the page that is shown next. MT will now create the relevant HTML files
- Aim eg. at http://linux.acme.com/mt/, and rejoy!
Linux Setup
- Edit Apache's httpd.conf:
AddHandler cgi-script .cgi
[...]
<Directory "/usr/local/apache-perl-php/htdocs">
Options Indexes FollowSymLinks MultiViews ExecCGI
If not, edit the lines above, and restart Apache with /usr/local/apache/bin/apachectl restart
Note: See the Hints section below for how to install MT's CGI scripts in the standard cgi-bin/ directory while keeping the rest of files under htdocs/
- Create a directory to host MT: mkdir /usr/local/apache-perl-php/htdocs/mt
- Create a directory where MT will save your blogs: mkdir /var/mt/
- Create a sub-directory to host your blog's archives: mkdir /var/mt/db/archives ; chmod -R 777 /var/mt
- Copy MT's Perl scripts and data files:
- cp -dR docs/ /usr/local/apache-perl-php/htdocs/mt/
- cp -dR lib/ /usr/local/apache-perl-php/htdocs/mt/
- cp -dR tmpl/ /usr/local/apache-perl-php/htdocs/mt/
- cp -dR images/ /usr/local/apache-perl-php/htdocs/mt/
- cp *cgi /usr/local/apache-perl-php/htdocs/mt/
- cp styles.css /usr/local/apache-perl-php/htdocs/mt/
- cp mt.cfg /usr/local/apache-perl-php/htdocs/mt/
- Run "which perl": If perl doesn't reside in /usr/bin, edit the shebang line ("#!") of the .cgi files accordingly
- Add a bit of security: chmod 750 /usr/local/apache-perl-php/htdocs/mt/*cgi
- Edit /usr/local/apache-perl-php/htdocs/mt/mt.cfg:
DataSource /var/mt
CGIPath http://mylinux.acme/mt/ - chown -R root.nobody /usr/local/apache-perl-php/htdocs/mt/
- Aim your browser at http://mylinux.acme/mt/mt-load.cgi
- Delete mt-load.cgi: rm -f /usr/local/apache-perl-php/htdocs/mt/mt-load.cgi
- Check if the two required Perl modules are set up on your host: http://mylinux.acme/mt/mt-check.cgi. If one or both of the modules are missing, here's how to download and install them:
- Create a sub-directory to host those new modules: mkdir /usr/local/apache-perl-php/htdocs/mt/extlib
- If you need the HTML::Template module
- http://www.cpan.org/modules/by-module/HTML/HTML-Template-2.4.tar.gz
- gunzip HTML-Template-2.4.tar.gz ; tar xvf ./HTML-Template-2.4.tar HTML-Template-2.4/Template.pm
- Create yet another sub-directory, and move the Template.pm module there: mkdir /usr/local/apache-perl-php/htdocs/mt/extlib/HTML/ ; mv HTML-Template-2.4/Template.pm /usr/local/apache-perl-php/htdocs/mt/extlib/HTML/
- If you need the Size.pm module:
- http://www.movabletype.org/downloads/Image/Size.pm
- mkdir /usr/local/apache-perl-php/htdocs/mt/extlib/image ; mv Size.pm /usr/local/apache-perl-php/htdocs/mt/extlib/image
- chown -R root.nobody /usr/local/apache-perl-php/htdocs/
- Rerun mt-check.cgi to check that both modules are now available: http://mylinux.acme/mt/mt-check.cgi
- Aim at http://mylinux.acme/mt/mt.cgi, and log on as Melody/Nelson
- To change the author name and password, click on "Edit your profile". Click on Save.
- Back in the home page, click on the First Blog link. This is a dummy blog that you can use to get your feet wet
- Click on "Edit Blog Configuration"
- Change the following information:
- Local Site Path = /usr/local/apache-perl-php/htdocs/mt
- Site URL = http://mylinux.acme/mt/
- Local Archive Path = /usr/local/apache-perl-php/htdocs/mt/archives
- Archive URL = http://mylinux.acme/mt/archives/
- Click on Save. The following information should show up at the top of the currently-displayed page: "Your blog configuration has been saved. REBUILD to see those changes reflected on your public site." Click on the REBUILD link.
- In the pop-up window that shows up, click on Rebuild All
- Once files have been rebuilt, close the popup window, and click on the First Blog item in the navigation bar at the top of the current window
Hints
- When the documentation recommends against keeping the data files in an HTTP-accessible directory (eg. htdocs/mt/), it refers to the original data from which actual HTML pages are rendered by the CGI scripts. In the test setup here, the original data files live safely in /var/mt/, while the rendered files live in /usr/local/apache-perl-php/htdocs/mt/. This can be confusing when setting up a blog (ie. Local Site Path and Local Archive Path settings)
- If you decide to install the CGI scripts in the standard cgi-bin/ directory, keep the other directories (docs/, images/, etc.) in DocumenRoot (eg. /usr/local/apache/htdocs/), and edit mt.cfg file to specify the URL to those files: StaticWebPath /usr/local/apache/htdocs/ . Otherwise, MT fails displaying GIF files because Apache complains that it cannot execute those files (eg. [error] [client 192.168.0.1] file permissions deny server execution)
- ActivePerl PPM packages are located at http://ppm.activestate.com/PPMPackages/
- To install a PPM package that is located on the local hard drive insted of fetching it through FTP, use ppm install d:\download\HTML-Template.ppd
- To upgrade a package through FTP, run ppm verify --upgrade mypackage
Issues
- Make sure that your browser supports JavaScript
- Doesn't take advantage of IE 5.x's support for basic WYSIWYG editing
- Layout seems to be designed for 640x480, leaving a lot of empty space when viewed at higher resolutions (eg. First Blog Editing Menu > List Entries > Edit Entry @ 1024x768)
- The first time MT is run, it creates archives.html in mt/ with risky access rights: -rw-rw-rw- -> chmod 660 archives.html . Same issue with index.html . Generally speaking, file ownership and access rights should be examined thoroughly (eg. all files should be owned by root.nobody, and be writable by root.nobody only; directories should be 770)
OpenLink Virtuoso
http://www.openlinksw.com/virtuoso/
Blogger
- Free, ASP-based service
- Some basic, XML-RPC, dedicated-clients are available: BlogBuddy (Delphi) and Jericho (Java)
SiteSpring
http://www.macromedia.com/software/sitespring/
eLog
- No thrill, stand-alone binary, saves entries into flat files
- http://midas.psi.ch/elog/
PhpCollab
pMachine
- Open-source, MySQL and PHP-based CMS
- http://www.pmachine.com/
NT
- Install MySQ
- Install Apache
- Install PHP
- Drop the Pmachine package into htdocs/ , and edit config.php so that Pmachine can connect to Mysql and create a (default) "pmachine" database along with a bunch of table
- Aim at http://localhost/pm/install.php, and follow instructions
RoboInfo Publisher
Windows-based WYSIWYG tool to manage a site from the user's workstation. http://www.ehelp.com/products/roboinfo/
Enhydra
Story Space
Groove
New collaboration appliation from Notes' Ray Ozzie. Available from Groove. Four products are available:
- Groove Preview Edition: Available for free
- Groove: Commercial super-set of GPE. Added features are ACLs to assign users specific roles and permissions within a shared space, ability to edit MS Office documents directly from Groove, and the ability to view documents in the shared space even if the required application is not available on the user's host
- Groove Bot Server: Server-based solution that enables users to share contextual information across firewalls; automated agent that provides a secure single point of integration between shared spaces and external systems such as ERP or CRM
- Groove Enterprise Network Services
Groove is a peer-to-peer application: Any change made to a shared space is replicated on all hosts that are running Groove and are members of that shared space. If a user is not currently online, changes are routed on a relay server, and will be replicated once he's back online. On a LAN, Groove sends a UDP broadcast every 10 seconds to locate other hosts running Groove. Groove offers end-to-end encryption, even when data are temporarily stored on a relay server because a user is currently offline.
Unless all Groove users are located on a LAN, it's more efficient for all Groove users to subscrive to a server to make their presence known (ie. that this particular user is online, and can be reached at a given IP address), so that clients do not have to poll the server continuously to check if they need to download any change made to the shared space: Instead, it's the server that connects to any client that needs to receive given changes ("publish-and-subscribe" architecture, just like Tibco's Rendez-Vous middleware)
The first time you start Groove, you either use an account that was previously created for you if your company bought licenses for Groove, or you create a new account for yourself. You can share a unique account between multiple computers, which has the benefit of letting you access the same shared space data from each computer. Using an existing account is an example of "component injection", ie. adding new features to your copy of Groove. Any file with extension .GRV or .VCG can be injected into Groove.
Resources
- O'Reilly Network: How Ray Ozzie Got His Groove Back [Oct. 24, 2000]
- Let's Groove With Ray Ozzie
- A Chat with the Master of P2P
- Reworking Online Work - Q&A with Ray Ozzie
- Collaboration Central
- Getting into the Groove
PHP SiteManager
http://www.roadsend.com/siteManager
FogCreek's CityDesk
Available from FogCreek. Under beta from Oct 15th 2001 through Nov 30th 2001. Slick WYSIWYG editor. A whole site lives on the user's workstation in a file of extension .CTY which can be opened by up to 255 users concurrently. The whole site is displayed in an outline (tree), which makes it very easy for editors to locate documents. Synchronization with a remote web server is done through either FTP or SMB/CIFS.
A site is actually a file, with extension .CTY. The Professional version of CD allows concurrent reading/writing, so a "site" can be accessed from multiples hosts in parallel. Each resource (HTML file, JPG file, etc.) is saved in that single .CTY file, and can be edited through CD's WYSIWYG editor.
A document can be displayed in either WYSIWYG mode or HTML mode. The application loads very fast and offers an unclutered, clean interface. Each document has a Properties section, where the user types information that uniquely identify this document (eg. Headline, Author, Keywords, etc.)
Each article can be displayed with a given template. Templates can contain both text and code. Code appears to be Perl with niceties (eg. {$foreach x in (all)$} ). Thus, contents and design are kept separate. What's a big confusing is that an Article in a .CTY site is already saved as HTML, but when rendered, it will go through a template and be displayed differently. Templates can include CSS to maintain a standard appearance. By creating multiple families of templates, an article can be rendered differently (eg. HTML, plain text, etc.)
When rendering a site or some documents into HTML locally (ie. Preview instead of Publishing), files are saved in C:\Documents and Settings\jdoe\Local Settings\Temp\citydesk_1128\
Once a page or an entire site has been rendered, a user can edit a page if they're using IExplorer: CityDesk adds an icon in the toolbar that allow people to edit the currently displayed page with CityDesk. This only works if the CTY file lives on the local computer (ie. NOK to edit a file that has been uploaded to the Intranet's web server.)
The main page is displayed by massaging the index.html file at the root of the filetree; This file contains CityDesk code and variables where you tell CD which folders to handle when rendering. Individual articles are handled through templates (View | Templates).
CityScript Quick Reference
(From online documentation)
Fields: (eg. {$.headline$}
headline, author, body, fileddate, filedtime, keywords, teaser, sidebar, about, extra1, extra2, link, filename
{$ foreach var in (condition) $} .... {$ next $}
{$ foreach var in (condition) SortAscendBy .field $} .... {$ next $}
{$ foreach var in (condition) SortDescendBy .field $} .... {$ next $}
Top 10 articles: {$ foreach 10 var in (condition) $}
(all)
(today)
(publishdate)
(before today) or (before publishdate) or (before yyyy/mm/dd)
(after today) or (after publishdate) or (after yyyy/mm/dd)
(folder "foldername")
(keyword_contains "keyword")
(author "name")
(filename "name")
(not (condition))
(or (condition1) (condition2))
(and (condition1) (condition2))
{$ setDateTimeFormat "language" "dateFormat" "timeFormat" $}
dateFormat: d, dd, ddd, dddd, M, MM, MMM, MMMM, y, yy, yyyy, gg
timeFormat: h, hh, H, HH, m, mm, s, ss, t, tt
Issues
- Application
- Chokes on Perl-specific keywords like foreach. Can't tell CityDesk to ignore .html files when looking for CityDesk code... Using HTML encoding like { for { or $ for $ doesn't work either because then you get wrong Perl in your HTML document, eg. {$myvar} ends up displayed as {{$$}$myvar} .... Joel S' work-around is to externalize any Perl code into a file (eg. test.pl), and tell CD to avoid parsing any file with that extension. Yuck.
- Windows-only
- No support for MDI windows: Several windows show up on the screen/taskbar
- The same application icon is used in the outliner and the editing windows, making it difficult to tell them apart when browsing through open windows with ALT-TAB (must read the window's title as shown in the list of open windows, eg. "test - FogCreek CityDesk" = outliner, "Getting Started... double-click here!" = document window)
- Little physical difference between the outliner (where the list of files that make up a site is shown) and editing windows (where documents are edited). Would like it better if used a single MDI-capable master window with the outline in the left hand-side, and multiple MDI child windows on the right hand-side when editing documents (example: Eudora or CityDesk's help file)
- Site contents: I find it confusing that the outliner lists both Articles and non-Articles (for lack of a better word), although they all constitute a site
- Templates: It's confusing that templates only apply to Articles
- File | New | Site: Confusing because it means that the current site will be closed and a new site will be opened, although this sub-item is listed at the same level as other items that allow the user to add new objects to the current site. The first time I hit File | New | Site, I assumed the current site would have a second site in the outliner
- File | New and File | Open do not remember the path the user last used. For instance, I kept the site files in C:\, but hitting those menus always started from a sub-directory under "C:\Documents and Files" instead of C:\
- I think a site's properties as shown in the View menu in the outliner should be moved to a tabbed dialog accessible through File | Properties instead
- When deleting an Article, focus should be on Cancel instead of OK to avoid mistakes, or provide an Undo item in the Edit menu
- Popup menu in outliner: When editing an HTML file, it says "Open, Open in Normal View, Open in HTML View"; When editing a Document, menu only says Open. I think presenting the user with three options before editing an HTML file is superfluous: Open is good enough, especially since it only takes one click in the editor to switch to the other mode (Normal View <> HTML View)
- Cannot paste pictures in an Article, which makes it difficult to take screenshots when writing documentation like user's manual
- Architecture
- I think it'd be better to move CD to a client-server system, where the client will interact with a server process, regardless of its location: If the user is connected to the network, CD will work with a remote server process; If the user is on the road and is working in disconnected mode, the server is running on the user's laptop. That way, the server process can automate the rendering issue (when a user is through editing the .CTY file or the DBMS where data are stored, it will automatically render the site to the intranet's web server). Incidently, I seem to recall that the SalesLogix CRM package provides a local DBMS (InterBase?) when sales people need to access data locally, ie. when they're working in disconnected mode
- Users do not work directly on what is hosted on their intranet, but rather an intermediary .CTY file, whose content must be rendered and saved on a remote site. Too complicated for non-techies
- Because editing of a site is done by opening a file, expect issues with firewalls and WAN links. Until CD comes up with replication between a local .CTY and a remote .CTY file, users who are away from the office will only be able to contribute by hitting the company's internal FTP server, or delay this until they're back at the office. Besides, for security reason, most companies will not provide access to internal servers from the Net. Lotus Notes makes this easy by synchronizing clients and servers through TCP 1352 and take advantage of encryption in case syncing is done over the Internet
- I think it'd be better to store data in a DBMS (MySQL, etc.) instead of a stand-alone file. Using a two-tier system (client-server) keeps the client unaware of the internal framework
- What about performances if CityDesk is used to manage a whole Intranet site from a single CTY file?
- Reliability of using a single .CTY file? Lotus Notes is known for corrupting .NSF files beyond repair. Scary.
- What about concurrent editing of the same document? Will CD stop the user from saving a document that a remote user has been editing before or after the local user edited it on his side?
- No support for source control, so no way to see which changes were made to a document on the Intranet, when, by who. This is one of my biggest peeves with Lotus Domino/Notes (it tells you that a document was changed by so and so, but not WHAT that person changed in the document)
- Support for disconnected mode and re-syncing later? (The user copies the shared CTY file from the server to their workstation, works on the file locally, and tries to merge their local work with what's on the server once they're back at the office)
- Uses HTML even for Articles instead of a new file format where a document consists in a single document (instead of independent HTML + JPG + CSS). Regarless of their technical ability, all users are inconvenienced with handling a document that actually consists in multiple parts, because this doesn't happen in word processors like Word. Would be nice to develop a server module for Apache that would perform on-the-fly translation between the CityDesk file format to HTML when a user views a document from a web browser, just like I assume Manila/Frontier does
- No support for ACLs to limit what users can do with CTY files (eg. Read, Create, Edit, Manage like in Lotus Notes.), and no support for authentication and authorization once the site has been uploaded to the intranet
- No support for local encryption: Intranets typically contain corporate trade secrets, and this lack of encryption is an issue when users have their laptop stolen while away from the office
- What about copying the idea of different databases in Lotus Notes, where each database would live in a different site in CD: The CD client woul display a vertical bar on the left side like the one in Outlook (eg. R&D, Marketing, Sales, Administration, etc.); When a user selects a site, an outliner is added on its right, and an MDI pops up when a user clicks on a document. Most users like and are used to the Outlook interface, so that would make the transition easier, and doesn't require their lauching a web browser to view the contents of their Intranet
Resources
*iki
ie. Ward Cunningham's Wiki, Peter Thoeny's Twiki, Simon Michael's Zwiki
Greymatter
- http://www.greymatterforums.com/
- written in Perl; For true WYSIWYG, you can probably use a JavaScript widget to input articles
- Some additional PHP mods are available to enhance GM
Windows Setup
We'll install the free HTTPd server OmniHTTPD 2.08:
- Run ohttpd208.exe
- Check in the task-bar that the OmniHTTPD server is running
- Start | Programs | OmniHTTPd Pro | OmniHTTPD Administration: In the "Virtual Servers in this Profile" section, select "localhost (default)" and click on Edit. Change Default Index from index.html to index.htm
- Click on the Web Server Global Settings button, and select the External tab: Select the .cgi extension, and change the path to PERL.EXE, if necessary
- From the GreyMatter archive, copy all *.cgi files into OmniHTTPD's CGI directory, eg. D:\OMNI\CGI-BIN
- Copy gm-icon.gif and index.html into the HTML directory, eg. D:\OMNI\HTDOCS
- Still in the HTML directory, create a sub-directory to save log entries: md D:\OMNI\HTDOCS\ARCHIVES
- Aim your browser: http://localhost/cgi-bin/gm.cgi, and log on as Alice/wonderland
- Click on Configuration, and change the following settings: Local Log Path=d:/omni/htdocs, Local Entries/Archives Path=D:/omni/htdocs/archives, Website Log Path=http://localhost, Website Entries Path=http://localhost/archives, Website CGI Path=http://localhost/cgi-bin
- Scroll down to the end of the Configuration page, and click on Save Configuration.
- Back in the home page, click on Configuration again, scroll down to the end of the Configuration page, and click on Diagnostics & Repair. Next, click on Perform Diagnostics & Repair
- If this operation is successful ("Diagnostics & Repair Complete"), click on Return to Main Menu.
- Click on Add a New Entry
- Fill in the Subject, Main Entry Text, and (optionally) the Extended Entry Text, and click on Add This Entry.
- Back in the Main Menu, click on Visit Your Site, and check that this first entry does show up in your blog. Done!
- If you get a "Warning: Failed opening '/myfile.php' for inclusion (include_path='') in d:\httpd\htdocs\index.php on line X", edit C:\WINNT\PHP.INI, and change the line that says "include_path" to eg. ".;c:\httpd\php" and restart the NT service
Linux Setup
Neat, conservative, configurable Perl-based weblog tool. Only Perl and Apache required. The tarball is available in either "Standard file format" (Windows) or "Unix file format". I assume the only difference lies in line endings (0x0D0A for the fomer, 0x0A for the latter), so make sure you download the right package for your platform.
- Run "which perl" to check that your Linux host has Perl installed, and that it's installed in /usr/bin/perl. If it's installed elsewhere, write down its location
- Create a sub-directory to host GreyMatter, eg. /usr/local/apache/htdocs/blog, and untar the package there
- If Perl is not located in /usr/bin/perl, edit the following files, and change the shebang line ("#!"): gm.cgi, gm-karma.cgi, gm-comments.cgi, gm-upload.cgi
- By default, Apache only accepts index.html as the home page, while GreyMatter
uses index.htm. Edit /usr/local/apache/conf/httpd.conf as follows:
<IfModule mod_dir.c>
DirectoryIndex index.html index.htm
</IfModule>
- Still in httpd.conf, jump to the <IfModule mod_mime.c> section, and activate this directive: AddHandler cgi-script .cgi
- Next, jump to <Directory "/usr/local/apache/htdocs"> (or wherever DocumentRoot points to), and add ExecCGI: Options Indexes FollowSymLinks MultiViews ExecCGI
- Move to the GreyMatter directory, and change access rights to the following files: cd /usr/local/apache/htdocs/blog ; chmod 755 gm.cgi gm-karma.cgi gm-comments.cgi gm-upload.cgi
- Change access rights of other .cgi files: chmod 666 gm-authors.cgi gm-banlist.cgi gm-config.cgi gm-counter.cgi gm-cplog.cgi gm-entrylist.cgi gm-library.cgi gm-templates.cgi
- Change access rights of the remaining files : chmod 666 index.htm ; chmod 444 gm-icon.gif installation.htm manual.htm
- Create a sub-directory where log entries and articles will be stored: mkdir /usr/local/apache/htdocs/blog/archives ; chmod 777 /usr/local/apache/htdocs/blog/archives
- Make sure that the user account under which Apache will spawn child processes has access to those files: cd /usr/local/apache/htdocs ; chown -R nobody.nobody ./blog
- Launch Apache: /usr/local/apache/bin/apachectl start
- Aim your browser at http://localhost/blog/gm.cgi, and log on as Alice/wonderland
- In the home page, click on Configuration, and check that the Patch Configuration section is correct. You might also want to change settings in the "E-Mail Options" section and the "Karma & Comments Options" section. Click on Save Configuration.
- You are back in the main page. Click on Configuration again, and scroll down to the end of the page that shows up. Click on Diagnostics_Repair, followed by Perform Diagnostics_Repair. If you get an error about GM being unable to access a file in archives/, hit Back, and click on Perform Diagnostics_Repair a second time.
- Click on "Return to Main Menu"
- To create your first news, click on Add a New Entry. Fill the three
sections, and hit either Preview Before Posting or Add this Entry.
Note: In the "Add a new entry" page, GreyMatter says: "Shortcut keys: CTRL-SHIFT-A to add a link, CTRL-SHIFT-B to bold selected text, CTRL-SHIFT-I to italicise, CTRL-SHIFT-U to underline". This works with IE 5.5, but not Opera 5.12 or Netscape 4.74, and this information is not even displayed in Netscape. If your browser doesn't support those shortcuts, use the following easy formatting: **bold**, \\italics\\ & __underlining__ . Easy formating doesn't work in the Subject field, and isn't rendered when clicking on "Preview Before Posting"
- Once back at the home page, click on "Visit your site", and check that this first news entry is available. If your browser doesn't spawn a new window, aim at http://localhost/blog/
- To create new users (and preferably, remove the default Alice/wonderland account, or at least change its default password), connect to the administration page http://mylinux.acme/greym/gm.cgi, and click on "Edit Authors"
If you wish to start afresh, copy the following files from the tarball, making sure that the access rights are correct: gm-config.cgi, gm-cplog.cgi, gm-entrylist.cgi, (and if you changed templates) gm-templates.cgi. Next, empty the archives/ sub-directory: rm -f archives/* .
Merging blogs
Someone probably came up with a way to merge two versions of a given blog, but here's a quick and dirty way. The issue was that I have a free ISP to host my blog, but it won't allow uploading CGI scripts. Being such a cheap sex-worker, I didn't want to get a paying account somewhere, so had to find a way to insert entries that I would send myself by e-mail while travelling through the US, while respecting the actual chronology...
- Copy the remote blog entries into your local archives/ sub-directories, choosing the next available entry number
- Edit the file, using |*||*| as paragraph separator
- Go the directory where the GreyMatter CGI scripts are located, and edit gm-counter.cgi to increase the last entry number
- Edit gm-entrylist.cgi, and add one line per entry. This is required if you want to edit a specific entry later through GreyMatter
- Connect to GreyMatter. In the Main Menu, click on Rebuild Files, followed by Rebuild Everything
Voilà! GreyMatter will create corresponding .HTML files for each .CGI entry files, update the main index index.html, archives/archive-122001.html (or whatever it's called on your site), and archives/index.html.
For instance, the last entry in my blog was archives/00000022.cgi. I copied this file as 00000023.cgi, and changed the following fields:
- 23|Alice|Test|5|12|14|2001|5|18|5|PM|0|0|0|no|no|open
- 0.0.0.0|I
- Paragraph1. |*||*|Paragraph2.
- 0.0.0.0|I
The first field ("23") must match the entry number that is used in the filename ("00000023.cgi"). The third field ("Test") is the Subject field. The fourth field is the day the entry was created, where 5 is Friday. The next three fields is the date (MM,DD,YYYY). The next three fields are the hour it was created (HH,MM,SS). I didn't need to changed the rest of the fields on this line. Finally, any text starting on line two is the entry itself.
Update gm-counter.cgi. I only changed the two following fields:
- 23
- 0
- 0
- 0
- 0
- 0
- 23
- 0
- 0
Finally, edit gm-entrylist.cgi:
26|Alice|Boston|12/16/01|10:00 PM|O|N
Caution! Do remember to use |*||*| as the paragraph separator in a entry section, and remember that GreyMatter uses an empty CR-LF to separate the standard entry for the extended entry... So watch out for any pesky 0D0A lying around when copy/pasting from somewhere else...
Customizing layout
The default layout of the home page isn't too sexy, nowhere like the nice layout of GreyMatter's home page. To make changes, log on as administrator, and click on "Edit Templates".
Here's a basic layout built on my modest knowledge of Cascading Style Sheets:
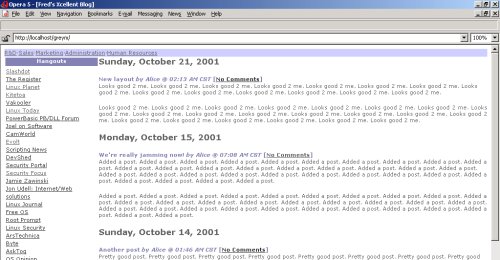
Main Index Template
- <!DOCTYPE HTML PUBLIC "-//W3C//DTD HTML 4.0 Transitional//EN">
- <HTML>
- <HEAD>
- <TITLE>Fred's Xcellent Blog</TITLE>
- <META HTTP-EQUIV="Pragma" CONTENT="no-cache">
- <META NAME="Generator" CONTENT="Greymatter {{gmversion}}">
- <LINK REL="STYLESHEET" HREF="blog.css" TYPE="text/css">
- </HEAD>
- <BODY>
- {{header}}
- <TABLE WIDTH="100%" CELLSPACING=0 CELLPADDING=0>
- <TR>
- <TD VALIGN=top ALIGN=RIGHT WIDTH="20%">
- <TABLE WIDTH="100%">
- <TR>
- <!--TD bgcolor="#8080B0"><b><font size="2" color="#FFFFFF" face="verdana,arial">Hangouts</FONT></b><P></TD-->
- <TH>Hangouts</TH>
- </TR>
- <TR>
- <TD>
- <a href="http://www.slashdot.org">Slashdot</a><BR>
- <a href="http://www.theregister.co.uk">The Register</a><BR>
- </TD>
- </TR>
- </TABLE>
- </TD>
- <TD VALIGN=top >
- {{logbody}}<HR>
- </TD>
- </TR>
- <TR VALIGN=BOTTOM>
- <TD>{{gmicon}}</TD>
- <TD ALIGN=RIGHT>[<A HREF="{{pagearchiveindexlink}}">Archives</A>]<P>Search entries:<BR>{{searchform}}</TD>
- </TR>
- </TABLE>
- {{footer}}
- </BODY>
- </HTML>
- <HTML>
Index Entry Template: Standard Entries
- <B><FONT COLOR="#8080B0">{{entrymainbody}} <I>by
{{authorsmartlink}} @ {{hourhour}}:{{minuteminute}} {{ampm}} {{timezone}}</I>
{{commentslink}}</FONT></B>
- <P>
Index Entry Template: Extended Entries
- <B><FONT COLOR="#8080B0">{{entrymainbody}} <I>by
{{authorsmartlink}} @ {{hourhour}}:{{minuteminute}} {{ampm}} {{timezone}}</I>
{{commentslink}}</FONT></B><BR>
- {{entrymorebody}}<P>
Date Grouping Template
- <P ALIGN=LEFT><FONT size="4">
- <B>{{weekday}}, {{monthword}} {{day}}, {{yearyear}}</B></FONT>
- </P>
- <B>{{weekday}}, {{monthword}} {{day}}, {{yearyear}}</B></FONT>
Header Template and Footer Template
- <TABLE WIDTH="100%" CELLSPACING=0 CELLPADDING=0>
- <TR>
- <TD BGCOLOR="#CCCCFF" COLOR="#FFFFFF"><a href="http://www.cnn.com">R&D</a>·<a href="http://www.cnn.com">Sales</a>·<a href="http://www.cnn.com">Marketing</a>·<a href="http://www.cnn.com">Administration</a>·<a href="http://www.cnn.com">Human Resources</a>
- </TD>
- </TR>
- </TABLE>
- <TR>
Miscellaneous
As far as security is concerned, I'm not sure it's very safe to chmod directories 777 or files 666, though. Likewise, in the above, all CGI scripts are kept in a sub-directory of DocumentRoot instead of being located in the standard cgi-bin/ directory.
Here's a script to automate some of the above (When copy/pasting from Windows or Macintosh, convert line endings to 0x0A):
- #!/bin/bash
- #
- # This script must be run in the directory where the GreyMatter tarball has been unarchived
- #
- #Only need if you d'loaded the Windows version of the package, and thus, need to to remove the extraneous 0x0D line ending character
- for i in `ls *cgi`; do `cat $i | tr -d '\r' > $i.new | rm -f $i | mv $i.new $i`; done
- chmod 755 gm.cgi gm-karma.cgi gm-comments.cgi gm-upload.cgi
- chmod 666 gm-authors.cgi gm-banlist.cgi gm-config.cgi gm-counter.cgi gm-cplog.cgi gm-entrylist.cgi gm-library.cgi gm-templates.cgi
- chmod 666 index.htm
- chmod 444 gm-icon.gif installation.htm manual.htm
- rm -Rf archives
- mkdir archives ; chown -R nobody.nobody archives
- chmod 777 archives
- chown -R nobody.nobody ./*
- #
Resources
Atomz Publish
http://www.atomz.com/services/atomz_publish/
ASP-based content management only
SPIP (Système de publication pour l'Internet)
PHP, Apache, MySQL.
SPIP was built on PHP3. If you built an Apache server with support for PHP4, edit httpd.conf to modify the following line:
- AddType application/x-httpd-php .php .php3
Available from http://www.uzine.net/
- Create a sub-directory to host SPIP, eg. mkdir /usr/local/apache/htdocs/spip, and untar SPIP there
- Launch Apache: /usr/local/apache/bin/apache start
- Aim your browser at http://localhost/spip/ecrire, and fill the required infos
NewsBruiser
http://crummy.com/devel/newsbruiser/
Prerequistes
Requires building an Apache that supports Python. If you are running RedHat 7.1, you'll have to uninstall the 1.5.2 python and python-dev RPMs because they were compiled with support for threads, which mod_python doesn't like. Do not compile and install python2, because Apache 1.3.20 fails compiling. Below, I used Python 1.6.1, mod_perl 2.7.5, and Apache 1.3.20. After compiling Python, either update PATH to include the directory where it now resides, or add a symlink in /usr/bin (cd /usr/bin ; ln -s /usr/local/nothread-python/bin/python python).
Compiling
The source code is untarred into /usr/src/, and Apache will live in /usr/local/apache-python/:
- Download the source code for Apache 1.3, Python 2.x, and mod_python, and untar into /usr/src
- cd /usr/src/Python ; make clean ; rm -f config.cache; ./configure --prefix=/usr/local/nothread-python --with-threads=no ; make ; mkdir /usr/local/nothread-python ; make install
- Compile mod_python. If it complains that Python has support for threads even though you ran --with-threads=no above, rm config.cache, and run ./configure again
- mod_python as DSO module
- cd ../apache ; ./configure --prefix=/usr/local/apache-python --enable-module=so ; make ; make install
- cd ../mod_python ; ./configure --with-apxs=/usr/local/apache-python/bin/apxs ; make dso ; make install
- ls -al /usr/local/apache-python/libexec, and check that shared library libphp4.so is available
- mod_python as static module
- cd ../apache ; ./configure --prefix=/usr/local/apache-python
- cd ../mod_python ; ./configure --with-apache=/usr/src/apache_1.3.20 --with-python=/usr/src/Python ; make static; make install
- cd ../apache ; ./configure --prefix=/usr/local/apache-python --activate-module=src/modules/python/libpython.a; make ; make install
- /usr/local/apache-python/bin/http -l, and check that mod_python and mod_include are compiled in
- cd /usr/local/apache-python/
- vi ./conf/httpd.conf:
LoadModule python_module libexec/mod_python.so //Only if mod_python built as DSO module
AddModule mod_python.c //Common to both static and DSO modules
AddHandler cgi-script .cgi
AddHandler server-parsed .ssi
AddType text/html ssi
//To avoid specifiying index.cgi as the default page
DirectoryIndex index.html index.cgi
//Scroll down to <Directory "/usr/local/apache-python/htdocs">
//... and edit its Options section
Options MultiViews Indexes SymLinksIfOwnerMatch Includes ExecCGI
- As nobody (or whatever UID you used in httpd.conf for User), untar the Newsbruiser package into /usr/local/apache-python/htdocs/nb/. Make sure the whole directory tree is indeed owned by nobody (chmod -R nobody.nobody nb/), and that all users can cd into nb/ (chmod -R 755 nb/), otherwise the nobody.nobody user under which child processes are spawned by Apache won't be able to enter the directory. Also chmod 777 nb/ so that nobody.nobody can create sub-directories there.
- Download fcrypt-1.2.tar.gz (used to call the Unix crypt function), and copy the fcrypt.py file it contains as crypt.py in both the nb/ directory and nb/tool . Cd to nb/tool, and run "python crypt.py" to create an encrypted password. Copy/paste the encrypted password in .nbrc below, on the line that says (you guessed it) password
- Create /usr/local/apache-python/.newsbruiser/.nbrc (Yes, it has to live outside the
DocumentRoot directory), and make sure nobody.nobody can read it:
[DEFAULT]
alink-color:red
link-color:blue
vlink-color:660066
bgcolor:white
text-color:black
display-time-format:%a %b %d %H:%M:%S %Y
no-entries-message:<h2>No entries.</h2>
working-dir:/usr/local/apache-python/htdocs/nb
description:No description
password:s8Oxsqmp9WGbs
authors:me
[weblog]
description:My weblog
alink-color:black
ordinal:0
[personal]
description:My personal notebook
ordinal:1
[shared]
description:My shared weblog
authors:Myself,My friend,My other friend
password:v/sWRxBpEJzzc
ordinal:2
- Edit /usr/local/apache-python/htdocs/nb/cfg.py:
#!/usr/bin/python
configFile = '/usr/local/apache-python/.newsbruiser/.nbrc'
#Change this to the URL of the directory in which NewsBruiser is installed.
baseURL = '/nb/' //Root actually starts at htdocs/ . See parameter DocumentRoot in httpd.conf
adder = baseURL + 'add.cgi'
editor = baseURL + 'edit.cgi'
viewer = baseURL + 'view.cgi'
searcher = baseURL + 'search.cgi'
lister = baseURL
version = '1.0' - /usr/local/apache-python/bin/apachectl start
- Aim your browser at http://mylinux/nb: Apache should run index.cgi
Foundationware
http://www.foundationware.com/
Allaire Spectra
http://www.allaire.com/products/spectra/
Allaire Homesite
http://www.allaire.com/products/homesite/index.cfm
Roxen
http://www.epact.se/~linus/roxen/
PHPWebSite
http://phpwebsite.appstate.edu/
Great looking.
Scoop
Source and documentation.
Virgule
http://virgule.sourceforge.net/
LiveJournal
http://www.livejournal.com/ . A neat Apache + Perl + MySQL (at least 3.23.33) weblogger with dedicated clients (Windows, Macintosh, etc.). Unfortunately, you must subscrive to try out the server on the Internet, so no way to check it out first before bothering to install the server at home.
What is BML?
Binary Markup Language. BML is a binary version of XML, it carries the same information, although using a binary encoding technique. BML was designed to address a lot of these problems. BML is a server-side markup language that lets you define your own BML blocks and use them as templates within your BML pages. Your templates don't even have to be static. Because BML pages are converted to HTML on the server when users request them, this also enables you to embed live code within your BML pages, just like a CGI script.
Server
- Download the latest source code from http://www.danga.com/lj/cvsweb.cgi/
- Copy the tarball into /home, and cd /home
- Untar the tarball
- Rename the LiveJournal-YYYYMMDD directory to lj, so you end up with /home/lf
- Delete the tarball: rm /home/LiveJournal-YYYYMMDD.tar.gz
- Install the following Perl modules, each by untarring the package, and
running "perl Makefile.PL ; make ; make test; make install". Note
that the LJ:: modules are available from http://www.livejournal.com/code/
. For the non-Perl savvies, a Bundle:: module actually only contains a list
of other Perl modules, so you can download a... bundle of Perl modules in
one go (see http://www.perldoc.com/cpan/
). Modules are available from http://www.cpan.org/modules/
:
Data::Dumper - For Net::Config
Net::Telnet - For Net::Telnet by Jay Rogers
Net::Cmd - for libbet itself
File::Spec
MD5
Compress::Zlib
Archive::Tar
Bundle::libnet
Term::ReadKey
Term::ReadLine::Perl # sorry, I'm discriminating the ::Gnu module
CPAN::WAIT
CPAN
Digest::MD5
Image::Size
FCGI
MIME::Lite
Compress::Zlib
MIME::Base64
URI::URL
HTML::Tagset
HTML::Parser
LWP::Simple
Time::DaysInMonth
GD
GD::Graph
GD::Text
DBI
Data::ShowTable
Mysql
DBD::mysql
Mail::Address
Proc::ProcessTable
LJ::Cache
LJ::TextMessage
LJ::SpellCheck
- Apache needs to have the mod_action and mod_rewrite modules
- Edit the httpd.conf in your Apache server, and add the following:
LoadModule action_module /usr/lib/apache/1.3/mod_actions.so
<VirtualHost www.lj.com>
RewriteEngine on
RewriteLogLevel 0
RewriteRule ^/~([a-z0-9_]+)(/?.*)$ /users/$1$2 [L,PT,NS]
RewriteCond %{REQUEST_URI} !\.bml
RewriteRule ^/community/([a-z0-9_]+)(/?.*)$ /users/$1$2 [L,PT,NS]
RewriteCond %{HTTP_HOST} ^([a-z0-9_\-]+)\.lj\.com$ [NC]
RewriteCond %1 !^www$ [NC]
RewriteRule ^(.+) %{HTTP_HOST}$1 [C]
RewriteRule ^([a-z0-9_\-]+)\.lj\.com(.+) /users/$1$2 [L,PT,NS]
RewriteRule ^/confirm/([a-z0-9]+\.[a-z0-9]+) http://www.lj.com/register.bml?$1 [L,R]
ServerAdmin webmaster@lj.com
DocumentRoot /home/lj/htdocs
ServerName www.lj.com
ServerAlias lj.com *.lj.com
DirectoryIndex index.html index.bml
ScriptAlias /cgi-bin/ /home/lj/cgi-bin/
AddType text/bml BML
Action text/bml /cgi-bin/bmlp.pl
AddType text/sbml SBML
Action text/sbml /cgi-bin/sbmlp.pl
<Location /users>
SetHandler cgi-script
</Location>
/VirtualHost>
- Edit /home/lj/cgi-bin/ljconfig.pl to suit your needs
- Run the mysql_setpermission script that comes with MySQL, and select option 2 to create a database for LiveJournal with the username/password you chose
- Create the tables, and add base data: mysql -ulj --password=PWD livejournal < livejournal.sql ; mysql -ulj --password=PWD livejournal < livejournal-data.sql
- Edit crontab
- The last thing you will need to do is register your own user. This should be userid 1.
- mysql --user=lj --password=PWD livejournal, followed by insert into
priv_map values(1,1,4,"all");
You now have the ability to grant Livejournal privledges from http://server/admin/priv/ - Create a user named "system" that will own the default styles
that come with the code
For higher performances, use FastCGI, and mod_backhand to do load balancing.
Client
Zope
vBulletin
http://www.vbulletin.com/features/
Freeware version available, but full version commercial. Requires Apache with PHP and MySQL. Support only available for the commercial version. The bulletin area works, but failed connecting to the Control Panel with Opera 5.12 through admin/index.php .
- Untar the package in eg. htdocs/
- Edit upload/admin/config.php: MySQL settings and admin password
- Aim you browser at http://mylinux/admin/install.php, and follow instructions
Ultimate Bulletin Board
SlashCode 1.x
Perl-based portal used on http://www.slashdot.org. Dowloadable from http://slashcode.com . As SlashCode requires a bunch of Perl modules, it's easier if you install it on a host that has access to the Net, and use Bundle-Slash-1.13.tar.gz to install the modules automatically. Note that SlashCode 1.x requires MySQL 3.22, and release 2 requires MySQL 3.23.- Install MySQL
- Unpack the source code into eg. /usr/src/mysql, and cd to it
- ./configure --prefix=/usr/local/mysql --with-low-memory
- make
- make install
- ./scripts/mysql_install_db //to initialize the grant tables
- Edit /usr/bin/safe_mysqld: Add export TZ=GMT at the beginning of the script
- Start MySQL: cd /usr/local/mysql ; ./bin/safe_mysqld &
- Set a password for the MySQL root account: /usr/local/mysql/bin/mysqladmin -u root -p password 'new-password'
- Install and launch Sendmail (needed to test the Mail-Sendmail Perl module below)
- Install Perl
- Install the required Perl modules (in this order)
- DBI-1.14
- Data-ShowTable-3.3
- TimeDate-1.08
- Msql-Mysql-modules-1.2209
- ApacheDBI-0.87
- Apache-DBILogConfig-0.01
- Apache-DBILogger-0.93
- libnet-1.0607
- HTML-Parser-2.25
- XML-Parser-2.27
- MIME-Base64-2.11
- Digest-MD5-2.09
- URI-1.04
- libwww-perl-5.47
- DateManip-5.35
- File-Spec-0.8
- Mail-Sendmail-0.77
- Compress-Zlib-1.08
- Image-Size-2.901
- Storable-0.6.9
- Build Apache and mod_perl
- Download and untar the Apache and mod_perl packages into /usr/src
- cd mod_perl ;
- perl Makefile.PL APACHE_SRC=../apache_1.3.20 DO_HTTPD=1 \
USE_APACI=1 PERL_MARK_WHERE=1 EVERYTHING=1 \
APACHE_PREFIX=/usr/local/apache-perl - make
- make test
- make install
- Check that mod_perl is installed: /usr/local/apache-perl/bin/httpd -l
- Launch Apache to check that it runs OK: /usr/local/apache-perl/bin/apachectl start
- netstat -tuplan | grep 80
- Stop Apache: /usr/local/apache-perl/bin/apachectl stop
- Install Slash
- Unpack the tarball in /usr/src/slash/
- make
- make install
Note: Some options you can pass as parameters (eg. make SLASH_PREFIX=/home/slash) are SLASH_PREFIX (Location for installed files; default is /usr/local/slash), INIT (Location for init scripts; /etc or /etc/rc.d), USER (User to own files; nobody), and GROUP (Group to own files; nobody).
- A configuration file is generated for Apache in $SLASH_PREFIX/httpd/slash.conf: Either copy its content in httpd.conf, or add an Include line to add it to the existing Apache configuration file.
- Run $SLASH_PREFIX/bin/install-slashsite VIRTUAL_USER, where VIRTUAL_USER is the MySQL logon name created above, and answer all the questions
- $SLASH_PREFIX/$SITENAME/$SITENAME.conf is created for you: Either copy/paste its content into httpd.conf, or add an Include line in httpd.conf
- Read the message printed at the end of running install_slashsite.
- Stop, and start Apache
- Run /etc/init.d/slash start
Issues
- Garbage in main screen
- /etc/rc.d/init.d/slash: Doesn't return. Need to CTRL-Z, bg %1 to regain control, or run /etc/rc.d/init.d/slashd start &
JetSpeed
http://jakarta.apache.org/jetspeed/site/index.html
Squishdot
http://www.squishdot.org. Squishdot is a news publishing and discussion product for Zope. It creates a place in your website where people can post short articles, news items, announcements, etc. as well as hold threaded discussions about them. In other words, Squishdot is a weblog product.
WWWThreads
Commercial. Available in PHP and Perl versions. Demo available. http://www.wwwthreads.com/
PHPSlash
http://phpslash.org/ Inspired by SlashCode.
- Install PHPLIB
- Untar the PHPSlash package
ThatWare
PHPNuke
Started by Francisco Burzi, and inspirated by ThatWare. Nuking The Competition.
- Untar the source, and cd to its sql/ sub-directory
- Create the database: mysqladmin create nuke
- Create the tables: mysql -uroot -p nuke < nuke.sql
- Cd ..
- Change ownership of files and directories: chown -R nobody.nobody ./html
- Check that all files are chmod 666 and directories are 777: find ./html -type d -exec chmod 777 {} \; ; find ./html -type f -exec chmod 666 {} \;
- Cd html/
- Edit config.php: $dbhost = "localhost"; $dbuname = "root"; $dbpass = "hf843i2"; $dbname = "nuke";
- Copy the directory tree to Apache's DocumentRoot: mkdir /usr/local/apache/htdocs/nuke ; chown -R nobody.nobody /usr/local/apache/htdocs/nuke ; cp -dpR ./* /usr/local/apache/htdocs/nuke
- Start Apache (/usr/local/apache/bin/apachectl start), and connect to http://localhost/nuke/admin.php. Admin=God, password=Password
- Click on the Preferences link, and make necessary changes. Click on Blocks to change the layout of the home page. Personally, I deactivated all blocks to keep a conservative, no-thrill interface
- At this point, the system is ready to go - point your browser to the location where you installed the files (say, "http://localhost/nuke/")
- To post your first article, click on Submit News in the home page. Once you have submitted the article, log on as Admin, and select Post article. Log out, and hit the home page: The article is now available for all to see.
Issues
Selecting any item in the admin.php page leads back to the Login page
Check that your browser allows cookies
How to set the mailer address?
Installed, and tried creating a user to be able to post my first article since logging on as God/Password would send me back to the Home page. Same thing when hitting Preferences:
- Registration Error!
- ERROR: Invalid Email
NewsForum
cog
Midgard
This short tutorial deals with Midgard 1.4 as release 2.0 is still under development as of Feb 2002.
Setup
- Build Apache with support for DSO modules
- Build MySQL 3.22.32 or newer
- Go to http://www.midgard-project.com/download, and download midgard- lib-1.4, midgard-data-1.4, mod_midgard-1.4 and midgard-php-1.4. Both RPMs and source tarballs are available, but I chose to use the source, Luke.
- Build midgard-lib
- Build midgard-data
- Build the Apache module mod_midgard
- Build Midgard-php
- Build PHP as a module (not as CGI), using the "--with-midgard=/usr/local/midgard" switch
Resources
- PHP, Apache, MySQL
- http://www.midgard-project.org/
- Demo available http://midgard-demo.marlowes.com/
- DevShed Interviews the Developers of Project Midgard
Atilla
- Install Apache and PHP. Make sure PHP is built to support access to MySQL, since this is the DBMS Attila works with
- Install MySQL
- Create a database: mysqladmin create attila
- Run the gosql script provided by Attila to create the tables it needs: mysql -uroot -p attila < gosql
- Copy the www sub-directory available in the Attila tarball into Apache's DocumentRoot (eg. /var/www/html/")
- Go to DocumentRoot, and edit configure.php3: $webmail="webmast@acme" $weburl="mylinux.acme" $serveur="mysnux.acme" $login="root" $pass_db="" $base="attila"
- Launch Apache, and check "http://localhost" (or whatever hostname it is where Apache + Attila is running)
- Log in as attila/attila (administrative account, so remember to change that default password)
daCode
- Untar the source, and cd to it
- cp src/phplib/config.sample src/phplib/config.php3
- Edit config.php3 (Part 1): sql_backend = mysql OR pgsql, sql_host = server where Apache is running (eg. localhost), sql_user = MySQL user with admin rights, sql_passwd = password for that account, sql_db = name of database where daCode will create its tables (eg. dacode)
- mysqladmin -uroot -p create dacode
- mysql -uroot -p dacode < sql/dacode.mysql
- Change ownership of the daCode files, and copy them to Apache's directory: chown -R nobody.nobody src/ ; cp -dpR src/* /usr/local/apache/htdocs/
- Connect to http://localhost/index.php3, log on as admin/admin, and create/validate your first news item
- Read documentation in src/docs
Takes a long time to load: Could it be due to stuff in config.php3 : "$this->basehref="http://localhost" "?
Top_banner.gif picture missing
Q&A
How to replace the Attila PHP logo by a corporate logo?
How to translate Attila into other languages?
Attila: Once connected as admin, empty page!
PHPNuke: Access rights strange
The INSTALL file says that files should be 666 and directories should be 777, but here's what I found when I untarred the source:drwxr-xr-x 2 root root 4096 Feb 8 09:59 admin -rw-r--r-- 1 root root 15368 Feb 15 22:34 download.ph drwxr-xr-x 13 root root 4096 Feb 8 09:58 images -rwxr-xr-x 1 root root 26780 Feb 11 00:09 reviews.php
Robert Scoble's Intranets that suck
The URL is here, but I decided to copy/paste this page in case it went away.
- I've been talking with a lot of people about their intranets and I'm seeing a trend. Most intranets suck.
- Keep in mind I'm not talking about folks who run little mom and pop businesses. I'm talking about folks who run major businesses you all probably know.
- One CTO told me "the place I just started working at didn't even have an intranet until I got there." He only has been able to put up an Apache server with a few rudimentary pages. I've looked at it and that sucks. But he isn't alone. A lot of companies have intranets that suck.
- Here's how to rate if your intranet sucks:
- 1) Can everyone publish on on your intranet? Really? Rate your system sucky if fewer than 80% of your employees regularly publish on your intranet (ie: at least once a week). If fewer are publishing, ask yourself why. I'll bet it's cause you're running on Apache or IIS (er, traditional Web servers or using FrontPage), which makes it too hard to put up pages for most people.
- 2) How many people are between the janitor and your intranet? Rate your system sucky if ANYONE needs to be involved for your janitor, or your CEO to publish on your intranet.
- 3) Does your intranet system require hard-to-learn (or expensive) client software like Macromedia's Dreamweaver or Microsoft's FrontPage? Rate your system sucky if any client software needs to be loaded for your employees to publish on your intranet.
- 4) Does your intranet require anyone who publishes to have an FTP application? Rate your system sucky if you require your users to get involved with arcane TCP/IP infrastructure models.
- 5) Does your intranet have interactive features like discussion boards? Rate your system sucky if your site is published only using static pages running on an Apache or IIS server.
- 6) Did your intranet software take your IT team more than one hour to setup? Rate your system sucky if it did. Your intranet should be easy to setup for your IT department. You want to spend your IT resources on improving your products and your customer-focused web sites.
- 7) Can your employees easily open a new URL for new projects or new divisions? Rate your intranet sucky if they need to get an IT guy involved to do that.
- 8) Does your intranet software cost more than $1000 for your entire company? Rate your intranet sucky if it does. (If you score this area sucky, it multiplies any other "sucky" answers on this quiz).
- 9) Does your intranet software work through firewalls and NAT's? Without getting your IT department involved? Rate your intranet sucky if it doesn't. All intranet software should work through port 80 with very few exceptions.
- 10) Does your intranet software publish to Palm devices without doing much, if any, extra work? Rate your intranet sucky if it takes more than an hour to set it up to publish all info to a Palm device.
- 11) When your CEO says "change the entire look and feel" of our intranet, how long does it take? Rate your intranet sucky if it takes more than 20 minutes for your entire site (after building a template). Do you need to change each page by hand?
- I'll give you a little secret. I'm finding that IT directors and CTO's are getting pressure to improve their company's internal communications and Notes and Groove and Outlook and Apache just aren't cutting it (although those can certainly help).
- I am incredulous that there are still companies out there who don't empower all their employees to publish for other employees. Consider what happens when you get your janitors to use the intranet. Let's say they notice that people are leaving their computers on at night. They might figure out that is costing the company hundreds of dollars per month. That might not sound like much, but in today's climate every bit helps (and, that hundred or so bucks a month would pay for your system in less than a year).
- Oh, this one company I know has folks who are getting paid $60,000 to $100,000 a year to HTML and put content up on the intranet (er, an Apache server). Think about that. You are making it harder for employees to publish AND you're spending large sums of money to do it! What a rip off! Instead, spend that employee time on improving your products. Think about it, your competitors are.
- Want to improve morale at your company? And keep your "A" employees? Give them good collaborative tools. Give them an intranet that doesn't fight them.
- If you think I'm making a big deal out of a minor problem, I'm not. The problem of intranets that suck is a very real one and is costing our businesses big time -- I've seen it first-hand at several companies in the past few weeks.
- I'd love to know how to help get people to think about this stuff. If you're running an intranet on Apache or IIS your intranet sucks. It IS that simple.
- I don't want to push it too hard here, but since joining UserLand Software a month ago, I've found an intranet system that doesn't suck in any of the above categories -- it's built using Manila. Send me email if you want to get a demo of it at: scoble@userland.com
Resources
- http://phpnuke.org
- http://slashcode.com/
- Intranet Journal
- Content Management Systems
- CMS Watch
- Free CGI scripts
- OpenCms
- WriteTheWeb
- Quelques principes pour rendre les intranets plus utiles
- L'explosion du "Web Content Management"
- The DHTML Editing Component
- Knowledge Management
- What Is Content Management?
- The Weblog Tool Roundup
- Weblogs Compendium
- Fulfilling the Middleware Promise
- Personal knowledge publishing and its uses in research
- Avoiding the web of costly content systems
- Thoughts on Content Management
- Weblogs Compendium - Blog Tools