Installing Linux on an IBM Netvista 2800 8364-EXX
Introduction
To hook up an IDE drive, you'll need the Molex 43025-400
adaptor.
Important: In the PS/2 plugs, the mouse and keyboard
plugs are the opposite of what they are on a PC, ie. with the motherboard side
lying on a desk, the mouse goes into the lower plug, and the keyboard goes into
the upper plug.
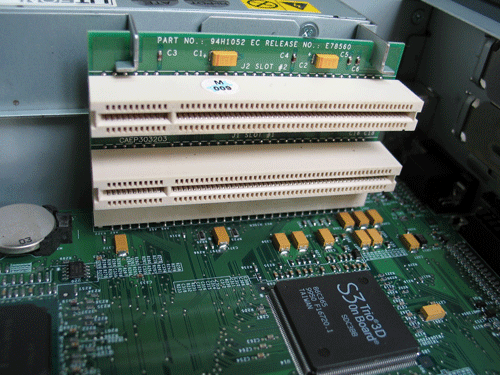
Based on what the PCI
slots look like, it seems like they use 5 volts. If you use a PCI card to
handle PSTN lines, make sure it supports both 3.3V and 5V, ie. Universal PCI.
As for the motherboard, Asterisk requires that it's at least PCI 2.2 so that
it handles IRQ's correctly, but I don't know if the one that ships with this
computer supports this version of PCI.
Half-length PCI = 32-bit?
Recommended Compact Flash: Transcend
This computer supports two BIOS's:
- Workspace on Demand (a.k.a. WoD), a regular PC BIOS, so can boot a regular
Linux
- Network Station Manager, "completly different, and relies on a IBM spec'd
Kernel image and some nastey configuration stuff (this firmware, NSBoot
is meant for booting Linux off a network and the machine acts like a
"Client")." "The other BIOS is designed for the IBM Netstation Manager. It is capable
of booting Linux ELF images from TFTP or NFS."
If you prefer to boot off a server using PXE, just set up a DHCP server and
an TFTP server. In the TFTP server's /tftpboot directory, add Syslinux's pxelinux.0,
its pxelinux.cfg/ directory with its default configuration file, and add a kernel
and a file system, eg. vmlinuz and initrd.gz using "kernel vmlinuz append
initrd=initrd.img" as configuration.
The alternative is to put a bootable Linux on the
Compact Flash card (preferably in read-only mode, in case the CF can't handle
many write accesses, although this seems to be either a thing of the past, or
limited to cheap brands), or an IDE drive (here
is the plug, and here
are the pins, both from Molex. If you can't find those, here's
the kind of crappy home-made solution you can use in the mean time).
There is a hidden menu that pops up in the Service Aids if you hit CTRL-F9.
- BOOTBLK: This creates a copy of the Network Station firmware (flash
image). The flash image that is stored on the CompactFlash card includes
both NS Boot and BIOS images. You need a CompactFlash card to complete this
procedure (256MB max).
- PASSWOD OVRD: When the BIOS is currently set to WorkSpace On-Demand
(WSOD), all configuration settings are cleared from the BIOS. On Network
Station (NS) Boot:, only the administrator password is cleared.
Booting the Netvista with DHCP + TFTP
- ddns-update-style none;
- ignore client-updates;
-
- option routers 192.168.0.254;
#Default Gateway
- option broadcast-address 192.168.0.255;
- option subnet-mask 255.255.255.0;
- option domain-name "workgroup";
- option domain-name-servers 208.67.222.222,
208.67.220.220 ?
- #option netbios-name-servers 192.168.0.2; #WINS Server
- default-lease-time 86400;
- max-lease-time 604800;
-
- subnet 192.168.0.0 netmask 255.255.255.0 {
- range 192.168.0.200
192.168.0.249; #DHCP Range to assign
- }
-
- host netvista {
- option host-name "netvista";
- hardware ethernet 00:06:29:34:60:21;
- fixed-address 192.168.0.10;
- #Caution: The client
assumes that the next-server handles both tftp and nfs.
- #Needed if TFTP running
on other host next-server marvin.redhat.com;
- option root-path "/tftpboot";
- filename "mx1500.sys";
- }
Another example:
- Put TurboLinux distro in /tftpboot, and booted Netvista with NSManager
BIOS:
-
- #required by ISC
- ddns-update-style none;
-
- #needed for PXE
- allow booting;
-
- allow bootp;
- option netstation-boot-protocol code 211 = text;
-
- option broadcast-address 192.168.0.255;
- option subnet-mask 255.255.255.0;
- option domain-name "workgroup";
- default-lease-time 86400;
- max-lease-time 604800;
-
- # Non-standard terminal boot and config options
- #option option-66 code 66 = ip-address; #
Boot server
- option option-67 code 67 = text; #
Boot filename
- option option-211 code 211 = text; #
Boot protocol
- #option option-212 code 212 = ip-address; #
Configuration server
- #option option-213 code 213 = text; #
Configuration directory
- #option option-214 code 214 = text; #
Configuration protocol
-
- subnet 192.168.0.0 netmask 255.255.255.0 {
- range 192.168.0.200
192.168.0.249; #DHCP Range to assign
- }
-
- host netvista {
- hardware ethernet 00:06:29:34:60:21;
- fixed-address 192.168.0.10;
-
- next-server 192.168.0.2;
-
- option option-67 "kernel.2800";
- option option-211 "tftp";
- filename "kernel.2800";
-
- #option 66 = next-server?
- #option option-66 192.168.0.2;
- #option 67 = filename?
- #option option-67 "/tftpboot/vmlinuz";
- #option option-211 "tftp";
- #option option-212 192.168.0.2;
- #option option-213 "/tftpboot/pxelinux.cfg";
- #option option-214 "tftp";
- }
"The netvista does not support booting from zipped kernel images so
that won't work. The unzipped image also needs to be a certain size."
Flashing the BIOS
There are three ways to flash a new BIOS:
- Put the image file at the root of a Compact Flash card, and boot up
(which BIOS?)
- Put bflash.2800 into a remote TFTP server's /tftpboot
- If you have a working Netvista whose BIOS you want to use to flash another
Netvista
Here's how to flash it with a CF card:
"I did the firmware upg by renaming bflash.2200 to kernel.2200. The
box now shows BL072902 (0729/02).
You have to format your CF card properly:
# fdisk /dev/sda
(delete everything if necessary)
n, p, 1, a, 1, w
# mke2fs /dev/sda1 (or equal)
It was important to make the filesystem on sda1 insted of only sda! Keep
that in mind if you face a similar problem.
I put the uncompressed linux-2200-0.2.1.tar.gz and BIOS for N2200 onto the
CF card. Flashed the BIOS by making the Netvista boot locally using the bflash.2200
file. Then confifured the Netvista to boot locally which makes it use the kernel.2x00
file. Then things started to work."
Here's the TFTP way (source).
"It IS possible to upgrade the firmware by dropping the bflash.2200 into
the root of the filesystem on the server or into /tftpboot in a linux box. In
your network config, tell the IBM to boot via TFTP, give it the server's address,
then tell it the bootfile is bflash.2200 If it works, you will get prompted
to update firmware.":
- On the TFTP server, configure DHCP this way:
option netstation-boot-protocol
code 211 = text;
group {
filename "bflash.2800";
next-server
tftp-server;
option netstation-boot-protocol
"tftp";
host netstation-8364-1
{
hardware
ethernet de:ad:be:ef:00:01;
}
}
- On the Netvista, choose the Netstation Manager BIOS
Here's the third way. On the source Netvista host:
- Move both J12 and J13 jumpers to the left, ie. away from the CPU heatsink
and towards the power supply
- Boot up (which BIOS?), and Netvista will write the BIOS to the CF card.
Once it's done, the LED will blink green (amber = failure).
On the target Netvista host:
- ? Switch to the Netstation Manager BIOS if not already done (won't work when in the Workstation
on Demande BIOS), and activate "Linux Flash Recovery". Turn off
the computer.
- Move the BOOTBLK jumper to the left, and boot up: The Netvista LED should be orange for
a fraction of a second, then fixed green for about 10 seconds, then blinking
green
- Move the BOOTBLK back to the right
Spécifications techniques
- Profondeur: 34.6 cm
- Hauteur: 29.3 cm
- Poids: 5.7 kg
- Couleur: Noir
-
- Processeur Intel Pentium MMX 266 MHz
- Mémoire cache
- Type: L2 - Pipeline Burst
- Taille installée: 512 Ko (installé) / 512 Ko (maximum)
- Carte mère
- Jeu de puces: Intel 430TX
- Ram
- Taille installée: 64 Mo / 256 Mo (maximum)
- Vitesse de mémoire: 100 MHz
- Facteur de forme: DIMM 168 broches
- Règle de mise à niveau: Barrette de 128 Mo maxi
-
- Réseaux
- Réseaux: Adaptateur réseau - PCI - intégré
- Protocole de liaison de données: Ethernet, Fast Ethernet
- Protocole réseau / transport: TCP/IP, IPX/SPX
- Conformité aux normes: IEEE 802.3, IEEE 802.3u
- Extension/connectivité
- Nombre total de connecteurs d'extension (disponibles):
- 2 ( 1 ) x mémoire - DIMM 168 broches
- 2 ( 2 ) x PCI - demi-longueur
-
- Contrôleur graphique
- Type: PCI - intégré
- Processeur graphique: S3 Trio3D
- Mémoire vidéo: SGRAM
- Taille installée: 4 Mo / 4 Mo (maximum)
- Résolution maxi (externe): 1600 x 1200 / 16 bits (64 000 couleurs)
- Affichages graphiques pris en charge: VGA (640x480), XGA (1024x768),
SVGA (800x600), SXGA (1280x1024), UXGA (1600x1200)
- Sortie vidéo prise en charge: RGB
-
- Sortie audio
- Type: Carte son - PCI - intégré
- Processeur de signaux: Cirrus Logic CS 4235
- Mode de sortie audio: Stéreo
- Taux d'échantillonnage max: 44.1 kHz
- Conformité aux normes: Sound Blaster 16/Pro, Microsoft WSS 1.0/2.0,
DirectSound, AC '97
- Périphérique(s) d'entrée
- Type: Souris, clavier
-
- Alimentation
- Type de périphérique: Alimentation
- Tension requise: CA 110/220 V ± 10% ( 50/60 Hz )
- Puissance fournie: 70 Watt
- Consommation en fonctionnement: 27 Watt
- Conformité aux normes: EPA Energy Star
- SE certifié: IBM OS/2 Warp Server 4.0 Advanced SMP, IBM Network Station
Manager 2.1, TurboLinux
- Logiciel: Pilotes de périphérique & utilitaires, Netscape Navigator,
Netscape Communicator, Citrix ICA, IBM Thin Client Manager 2.1
- Niveau sonore: 27.5 dB
Resources