OpenSSH for the Impatient |
|
What is it for, and how does it work?
SSH is a neat piece of software that works as a secure replacement for telnet. When connecting to a remote host, the data stream is encrypted during the entire session. Telnet, on the other hand, sends data in clear text, including your password... If the two hosts are connected on a hub instead of a switch, anybody running a sniffer can read all the data sent between those two hosts. Running a switch does offer more security, but we need more than this for sound security.SSH was written originally by Tatu Ylonen. While SSH 1.x was open-source, 2.x is now a commercial product and also relies on patented algorithms, which prompted the OpenBSD (Aaron Campbell, Bob Beck, Markus Friedl, Niels Provos, Theo de Raadt, and Dug Song) to come up with an open-source alternative called (you guessed it) OpenSSH. It boilds down to the SSHd daemon that runs on the server, and the SSH client which you need to install on all client hosts that need to connect to servers in SSH mode. There are a couple of additional utilities to manage the pair of public/private keys that are used for authentication, along with a bunch of configuration files.
Installing OpenSSH (server and client)
The basic steps are:- Download the required packages
- (Optional) Edit SSHd's configuration file to support password-based authentication
- From a remote client host, launch SSH and connect to the server running SSHd. You're in business!
- OpenSSL
- OpenSSH (core package)
- OpenSSH-Server and/or OpenSSH-Client
Generating RSA keys: .ooooooO..................ooooooOOnce installed, make sure /etc/hosts.allow permits access to SSHd, even if you are running SSHd as a stand-alone daemon instead of a dynamic process that is launched through INETd:
Key generation complete.
Your identification has been saved in /etc/ssh/ssh_host_key.
Your public key has been saved in /etc/ssh/ssh_host_key.pub.
The key fingerprint is:
5f:a0:0b:65:d3:82:df:ab:33:52:6f:89:9a:fe:e9:52 root@[local machine]Generating DSA parameter and key.
Your identification has been saved in /etc/ssh/ssh_host_dsa_key.
Your public key has been saved in /etc/ssh/ssh_host_dsa_key.pub.
The key fingerprint is:
64:85:4a:da:cf:74:94:0d:5a:93:cf:f2:62:ed:07:26 root@[local machine]
/etc/hosts.allowFYI, sshd is normally not run from inetd because it needs to generate the server key before it can respond to the client, and this may take tens of seconds. Clients would have to wait too long if the key was regenerated every time.
sshd: .acme.com/etc/hosts.deny
ALL: ALL
At this point, launch SSHd through /etc/rc.d/init.d/sshd start, and check for any error message in /var/log/messages.
Your first connection: Telnet look-alike
As explained later, SSH supports different ways to authenticate users. The easiest way looks just like when connecting with telnet. The user sees a login, and must type the password to his account on the Linux server. The only difference is that the whole connection is encrypted.
Install an SSH client on the client host, and type ssh remote.acme.com . If this is the first time you connect, you are prompted whether you want to receive the server's public key, which will be used for the two hosts to exchange a random number that will be used to encrypt the rest of the session. In the Windows SSH client SecureCRT, the server host public keys are saved in the Registry:
[HKEY_CURRENT_USER\Software\Van Dyke Technologies\SecureCRT\SSH]
"linux.acme.com"=hex:b5,bd,d8,5e,dd,dc,1f,60,02,63,bc,4d,19,54,36,70,2b,b5,c0,\
  0c,f5,37,72,14,8e,e6,72,23,bd,96,b8,8d,ef,2a,3d,84,8b,b0,20,82,5a,da,ed,57,\
  e4,61,7f,c4,e1,49,6e,1d,40,44,3b,ea,3d,27,1b,22,10,ff,c0,1f,68,65,ef,60,97,\
  91,8e,d6,37,eb,13,3a,34,9c,64,06,51,0c,46,87,b8,41,0c,3c,ce,36,07,65,45,4b,\
  ee,3d,82,54,3e,ac,a1,a6,26,a4,f9,ec,db,eb,ae,ac,d2,df,aa,1a,76,5d,2b,50,57,\
  6b,ff,51,93,d2,3e,81,b6,f9
When connecting from a Linux host and running the SSH client, SSH will ask if you want to save a copy to ~/.ssh/known_hosts (RSA) or ~/.ssh/known_hosts2 (DSA):
	#This is an example when connecting with an SSH version 1-compliant client
	The authenticity of host 'linux.acme.com' can't be established.
	Key fingerprint is 1024 5f:a0:0b:65:d3:82:df:ab:44:62:6d:98:9c:fe:e9:52.
	Are you sure you want to continue connecting (yes/no)?

	#This is an example when connecting with an SSH version 2-compliant client
	The authenticity of host 'linux.acme.com' can't be established.
	DSA key fingerprint is e2:47:78:4c:d6:71:c5:4c:15:f2:5d:4f:18:d7:fa:f4.
	Are you sure you want to continue connecting (yes/no)? yes
Above, SSHd is asking the client whether he wants to download the server's public key since it cannot be found in the user's home directory. The server's public key is now available in ~/.ssh/known_hosts (SSH version 1) or ~/.ssh/known_hosts2(SSH version 2) .
For added security, you should distribute a server's public key(s) to all the clients that you know are likely to have to connect to it through SSH. By the way, every new connection to an SSHd server involves checking that the server's public key hasn't changed (pretty likely), which is another security feature.
If you need to connect to an account that is different from the one you are currently using on the client host, either su to that account locally, or use the -l switch (eg. ssh -l myremoteaccount server.acme.com).
When creating a connection profile, SecureCRT lets you specify either Password or RSA: The former is what you just did, while the latter is the second secure way to connect to an SSHd server, which is explained below.
Your second connection: Key-based challenge
If you do not want to be prompted with a login, the second secure way to be authenticated by an SSH server is to generate your own pair of public/private keys on the client host, and copy/paste this new public key in ~/.ssh/authorized_keys (SSH1) or ~/.ssh/authorized_keys2 (SSH2) in your home directory on the server.Needless to say, the account name you specify when you want to connect must match the account which has your public key in its home directory. In other words, it's possible to connect to someone else's home directory on an SSH server as long as your public key is found in ~/.ssh/authorized_keys. If you want to remove access, all you need to do is delete the public key from that file, and the remote user will no longer be able to connect to your home directory.
Provided you do not set a passphrase to protect the private key sitting on the client host, you will not see a login prompt, and connect directly. In the absolute, you should set a passphrase to prevent someone who stole your private key to connect to a remote SSH server that accepts that kind of transparent authentication, but since the whole point is to avoid typing a password, it's counter-productive.
In SecureCRT, you can generate your pair of public/private keys this way : File | Connect, select the connection you created to connect in password mode previously (or click on New if no connection is available yet; In this case, select ssh as Protocol), and click on the Advanced button, followed by a click on Create Identity File.
SecureCRT saves your set of public and private keys as identity.pub and identity, respectively. All you need to do now, is copy/paste the contents of identity.pub into ~/.ssh/authorized_keys. Remember to select RSA as Authentication method instead of Password to tell SecureCRT that you do not want to be prompted for a password.
FYI, the string that follows the public key in identity.pub is what you typed as Comment when you generated your set of keys in the "RSA Key Generation Wizard", and can be removed with no impact.
Also, remember to set access rights to ~/.ssh/ to 555, or SSHd won't let you connect (/var/log/messages says:"RSA authentication refused for jdoe: bad ownership or modes for '/home/jdoe/.ssh'.")
Finally, make sure your DNS is pristine, ie. all hosts in the zone have corresponding PTR records in the reverse zone, or SSHd will issue a warning: "Could not reverse map address 192.168.1.43".
SSH-capable clients for Windows
At least three SSH-capable applications are available for Windows: SecureCRT (from Van Dyke Technologies; commercial), PuTTY SSH (free), and Tera Term Pro (from T. Teranishi; free) which requires dowloading Robert O'Callahan's SSH extension TTSSH (also free.) Note that while the latest and greatest SecureCRT supports SSH1 and SSH2, PuTTY and TTSHH only support SSH1.SSHWinSecureShell21.exe
Cedomir Igaly's SSH Windows Client 2.100
Cedomir Igaly e-mail: c.igaly@doc.ic.ac.uk
Department of Computing
Imperial College of Science, Technology and Medicine
180 Queen's Gate London SW7 2BZ
United Kingdom
Unless I've overlooked things, Tera Term is not as good (cannot save the port # used to connect to a given host; you are prompted every time whether to download the server's RSA public key if it not found on the client even when you selected password-based authentication; You cannot save the password locally and are required to type it at every connection; Clicking on Discontinue in this dialog box generates a GPF and closes the application, etc.), but it's free... Note that you can avoid some of those quirks by adding a short-cut to your desktop that calls TTSSH with command-line arguments, eg. ttssh server.acme.com:22 /ssh
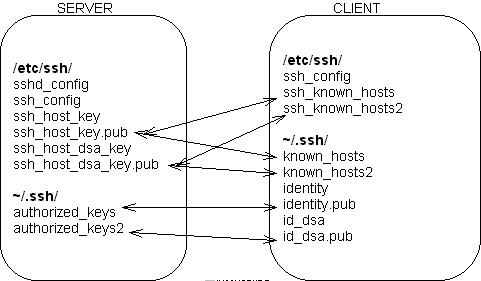
List of files
Configuring SSHd and SSH
SSHd is configured through /etc/ssh/sshd_config. Clients are configured through either command-line options, ~/.ssh/config, or system-wide /etc/ssh/ssh_config.#Sample for /etc/ssh/sshd_config
Port 22
Protocol 2,1
ListenAddress 0.0.0.0
HostKey /etc/ssh/ssh_host_key
ServerKeyBits 768
LoginGraceTime 600
KeyRegenerationInterval 3600
PermitRootLogin no
IgnoreRhosts yes
StrictModes yes
X11Forwarding no
X11DisplayOffset 10
PrintMotd yes
KeepAlive yes
SyslogFacility AUTH
LogLevel INFO
RhostsAuthentication no
RhostsRSAAuthentication no
RSAAuthentication yes
PasswordAuthentication yes
PermitEmptyPasswords no
CheckMail no
UseLogin no
#Here's a sample of ~/.ssh/config
# This section creates an alias for mylogin@server.acme.com => myserver
Host *myserver
HostName server.acme.com
User mylogin
ForwardAgent yes
Compression yes
# This section = default settings
Host *
PermitRootLogin no
#Users cannot use their login to connect, and must copy their RSA/DSA public key in their home directory
PasswordAuthentication no
ForwardAgent no
ForwardX11 no
FallBackToRsh no
Managing server and client keys
Deploying server public keys
Once SSHd is installed on the server and SSH on the different client hosts that need to connect to your SSH server, copy the following keys from the server into the home directories of users on the client hosts: /etc/ssh/ssh_host_key.pub and /etc/ssh/ssh_host_dsa_key.pub.In home directories, those server public keys must be renamed to ~/.ssh/known_hosts and ~/.ssh/known_hosts2, respectively. Remember: Those public keys belong to the server, and are used to make sure that clients do indeed connect to their actual SSH server and not some hacked server that pretends to be their SSH server through IP spoofing and DNS hijacking.
Any new hosts are automatically added to the user's file. If a host's identification ever changes, ssh warns about this and disables password authentication to prevent a trojan horse from getting the user's password. Another purpose of this mechanism is to prevent man-in-the-middle attacks which could otherwise be used to cir cumvent the encryption. The StrictHostKeyChecking option (see below) can be used to prevent logins to machines whose host key is not known or has changed.
Uploading client user public keys
Use either ssh-keygen (SSH 1) or ssh-keygen -d (SSH 2) to generate your client keys. The former creates ~/.ssh/identity and ~/.ssh/identity.pub, and the latter, ~/.ssh/id_dsa and ~/.ssh/id_dsa.pub .Once a user has created his two sets of RSA and DSA keys, he must upload the public keys into his home directory on all the servers that he connects to in SSH. The two public keys are identity.pub (RSA) and id_dsa.pub (DSA), respectively. When copied onto a server in ~/.ssh/, they must be renamed authorized_keys and authorized_keys2, respectively, be chmod'ed to 644, and be owned by this user.
If for some reason you have several pairs of keys, you can append them to the authorized_keys or authorized_keys2 file.
From Kimmo Suominen's Getting started with SSH:
If you have multiple accounts you might want to create a separate key on each of them. I have separate keys for
- my office environment
- my private systems
- my Internet service provider (ISP) systems
- my university account
This allows me to limit access between these organizations, e.g. not allowing the university account to access my ISP account or the machines in the office. This enhances the overall security in case any of the authentication keys are compromised for some reason.
Copying files through SCP, SFTP, and RSYNC
To copy FILE-A from the remote server to the local client and save it under the same name:scp mylogin@server.acme.com:FILE-A .If your local ~/.ssh/config file contains the HostName (eg. Host *myserver and HostName server.acme.com) and User items (eg. User mylogin), you can use this type of shortcut:
scp myserver:FILE-A .To copy a whole directory tree, use the -r command-line to have SSH operate recursively.
sftp establishes an SSH tunneled FTP connection to a server and allows you to use most of the standard FTP command set. The popular gFTP supports sftp.
RSync supports the use of SSH to create a secure tunnel between source and target hosts through the use of the -e ssh command-line switch.
Running commands on a remote server
This is the equivalent of remsh, where you don't have to connect and run the commands:ssh remote.acme.com df
Tunneling SSH-unaware applications
This is called port forwarding, and can be used to offer eg. secure POP/IMAP connections. It's done by using the -L switch when using SSH on the client. With SSHd running on the same server where POP/IMAP is running, SSH will transfer incoming bytes from the SSH socket to the POP/IMAP socket transparently.Here's how to download your email from an IMAP server, with SSHd running on the same server:
(CHECK) ssh -f -l mylogin mail.acme.com -L 1234:mail.acme.com:143=> A local socket 1234 is created. Provided your mail client lets you choose the port number instead of mandating that IMAP must be on port 143... all data meant for the remote IMAP server will actually be sent to the SSHd on the server, where bytes will be transfered from the SSHd socket to the IMAPd socket. That way, neither your password nor the rest of the connection will be sent in clear text, without requiring a secure version of IMAPd (if there is such a thing.)
(CHECK) ssh -f -L 143:localhost:143 mylogin@mail.acme.com
Sessions with pass-through authentication
This method comes in handy when you usually connect to more than one machine during a session. The trick is to run applications which are automatically authenticated. This is achieved by a combination of the programs ssh-add and ssh-agent. man ssh-add reads: "The authentication agent must be running and must be an ancestor of the current process for ssh-add to work." Huh? ;)ssh-agent executes several commands, creates an PID file and sets some system environment variables. To make this work, you need the shell's eval command: eval $(ssh-agent) You should now see a message like Agent pid [number] Enter ssh-add in the same terminal and the key will be loaded into memory, asking you for the password, if you have protected the key with one. Now you can start SSH sessions from this terminal without having to give any passwords, provided you set up the SSH 'config' file accordingly, which will be discussed on the next page.
If you want 'ssh-agent' to be the 'ancestor' of all virtual terminals in a session, add the command eval $(ssh-agent) to your personal X startup files, either '~/.xinitrc', if you are starting X from the console, or '~/.xsession', if you are booting directly into X. Then run ssh-add and all terminals you will open during this session will be authenticated. Other useful options are ssh-add -l which lists the key(s) currently kept in memory, and ssh-add -d which removes an identity from the system memory.
Q&A
Resources
- Using ssh Port Forwarding to Print at Remote Locations
- Pass on Passwords with scp By Dave Sirof
- SSH tricks by michuk