Creating a Ubuntu LiveCD
Introduction
Linux, the big picture
Source files
The sources to the Linux kernel are available either from the official site www.kernel.org (a.k.a. "upstream kernel") or from the repository of the Linux distribution you are using. Sources provided by Ubuntu, Fedora, etc. may differ from the official sources.
In addition to the C files, you'll also need to install the header files. Those are especially needed to compile modules (device drivers). Make sure the version of the source/kernel files and the header files match, ie. it's NOK to run version 2.6.1 of the Linux kernel and compile device drivers using version 2.6.2 of the header files.
Device drivers can be compiled either inside the Linux kernel (static modules) or as external modules (dynamic modules). Provided the kernel was compiled with support for loading external modules dynamically at run-time, compiling a new kernel is only needed when you'd like to add or remove static drivers to the kernel. Compiling a new dynamic module only requires providing the compiler with the kernel header files (eg. "apt-get install linux-headers-$(uname -r)").
Binary files
Here's a description of the files located in /boot:
- System.map: map between the kernel and the known addresses of hardware
- abi ("application binary interface"): kernel "hooks" a program can call to process commands, system libraries, etc. Because these machine language addresses move from time to time, the abi provides a common directory for applications to reference
- config: states whatever modules and kernel settings are available
- vmcoreinfo: primarily for determining which information shows up during 'core dumps' (crashes)
- vmlinuz: compressed kernel that the system uses upon boot
To fit the proverbial floppy, the kernel (vmlinuz) is compressed, and only includes the bare minimum. To access peripherals, modules can be outsourced in a temporary root filesystem called initrd.gz ("initial RAM disk" image) which is loaded and uncompressed in RAM so that the kernel can access the mass storage (hard-disk, USB, CD, etc.) where the full Linux distro lives.
A live CD ISO file includes squashfs, which is the image of a complete filesystem to be uncompressed in RAM.
Starting the user-space application init is the final stage of the boot process; Init will take care of loading all the user-land applications.
Here is a graphic illustration of the whole boot process: BIOS → boot loader → vmlinuz + initrd → mount filesystem (either squashfs or an actual filesystem on a hard-disk or USB key using /etc/fstab) → init → applications
.jpeg)
Compiling a new kernel under Ubuntu
apt-get update
apt-get upgrade
You might need to reboot to run the latest Linux kernel provided by Ubuntu
uname -a
apt-get install gcc g++ make
apt-get install linux-headers-$(uname -r)
Compiling a new dynamic module under Ubuntu
How to check what drivers the kernel contains statically, if any?
How can I check that a kernel was compiled with support for loading modules dynamically?
What applications will be impacted by adding a new driver to an existing ISO image?
Customizing an existing live USB ISO file
Using Ubuntu Mini Remix
http://www.ubuntu-mini-remix.org/
Script driven Ubuntu 9.10 builds Featuring e17-svn and LXDE
From any ISO file
Based on LiveCDCustomization.
It's easier if the host and the ISO file use the same version of the distribution.
Since we'll be using chroot, it's also easier to keep two sessions open, so as to be able to copy files from the underlying host to the chroot session without having to enter/exit chroot every time.
Since no command-line application seems to exist to edit an ISO file directly (ISO Master is an X application), you'll have to extract the files in a directory, edit them, and write a new ISO file when done.
- Install the prerequisites:
sudo apt-get update
sudo apt-get install squashfs-tools genisoimage binutils
- Download and mount the ISO:
cd
wget -c http://download.bitdefender.com/rescue_cd/bitdefender-rescue-cd.iso
mkdir ~/livecdtmp
mv bitdefender-rescue-cd.iso ~/livecdtmp
cd ~/livecdtmp
mkdir mnt
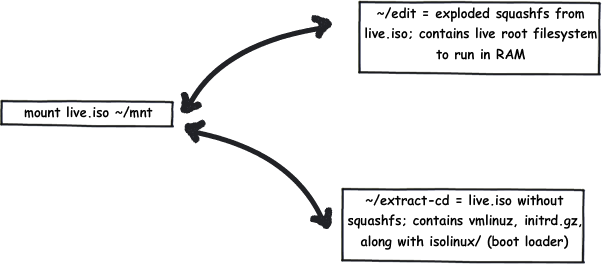
sudo mount -o loop bitdefender-rescue-cd.iso mnt
- Into a directory, eg. extract-cd/, extract /casper without squashfs
(the root filesystem that will be unpacked in RAM):
mkdir extract-cd
rsync --exclude=/casper/filesystem.squashfs -a mnt/ extract-cd
- Into another directory, eg. edit/, extract squashfs:
sudo unsquashfs mnt/casper/filesystem.squashfs
sudo mv squashfs-root edit
sudo umount mnt (no longer need to access the ISO file)
- chroot to edit/:
sudo cp /etc/resolv.conf edit/etc/
sudo cp /etc/hosts edit/etc/
sudo mount --bind /dev/ edit/dev
sudo chroot edit
mount -t proc none /proc
mount -t sysfs none /sys
mount -t devpts none /dev/pts
dpkg-reconfigure locales
locale-gen fr_FR fr_FR.UTF-8 en_US en_US.UTF-8
//export HOME=/root
//export LC_ALL=C
dbus-uuidgen > /var/lib/dbus/machine-id
dpkg-divert --local --rename --add /sbin/initctl
ln -s /bin/true /sbin/initctl
IMPORTANT! If you decide to delete edit/ at the end, remember to unmount the above mount's before doing so, otherwise your host system will become unusable at least temporarily until reboot
- Install/update/remove applications:
apt-get update
dpkg-query -W | less
To upgrade the kernel through apt-get:
apt-cache search linux-generic-
apt-get install linux-generic-123
(it should have created a /boot with all the files required to run a kernel, and updated the symlink at the root)
squashfs doesn't contain /boot -> kernel lives outside squashfs, at root of ISO file, so next, either by exiting chroot or from a non-chroot console logged on as root:
cd /home/user/livecdtmp
sudo cp edit/boot/vmlinuz-123 extract-cd/casper/vmlinuz
sudo cp edit/boot/initrd.img-123 extract-cd/casper/initrd.gz - Back in the chroot, make sure no UID > 999:
awk -F: '$3 > 999' /etc/passwd
sudo usermod -u 500 $hit
- Still in chroot, clean up:
du -sh /var/cache/apt/archives
apt-get clean
apt-get autoclean
rm -rf /tmp/* ~/.bash_history
rm /etc/resolv.conf
rm /var/lib/dbus/machine-id
rm /sbin/initctl
dpkg-divert --rename --remove /sbin/initctl - Still in chroot, if you added new modules, generate a new initrd.gz:
http://wiki.linuxquestions.org/wiki/Initrd
Ubuntu 9.04 = initrd.gz, 9.10 = initrd.lz
(Check kernel version in edit/lib/modules)
# mkinitramfs -o /initrd.gz 2.6.31-22-generic
From a non-chroot console:
sudo mv edit/initrd.gz extract-cd/casper/ - Within the chroot:
umount /proc
umount /sys
umount /dev/pts
exit
sudo umount edit/dev - Generate new manifests:
chmod +w extract-cd/casper/filesystem.manifest
sudo chroot edit dpkg-query -W --showformat='${Package} ${Version}\n' > extract-cd/casper/filesystem.manifest
sudo cp extract-cd/casper/filesystem.manifest extract-cd/casper/filesystem.manifest-desktop
sudo sed -i '/ubiquity/d' extract-cd/casper/filesystem.manifest-desktop
sudo sed -i '/casper/d' extract-cd/casper/filesystem.manifest-desktop - Make a new squashfs:
sudo rm extract-cd/casper/filesystem.squashfs
sudo mksquashfs edit extract-cd/casper/filesystem.squashfs -no-duplicates
- Edit image name:
sudo chmod 644 extract-cd/README.diskdefines
sudo vi extract-cd/README.diskdefines - Generate new MD5 files:
cd extract-cd
sudo rm md5sum.txt
sudo find -type f -print0 | sudo xargs -0 md5sum | grep -v isolinux/boot.cat | sudo tee md5sum.txt - Create ISO:
cd ~/livecdtmp?
sudo mkisofs -D -r -V "$IMAGE_NAME" -cache-inodes -J -l -b extract-cd/isolinux/isolinux.bin -c extract-cd/isolinux/boot.cat -no-emul-boot -boot-load-size 4 -boot-info-table -o ../ubuntu-2.6.31-22-custom.iso .
- If the host is fast enough, use qemu to test:
cd ~
qemu -cdrom live.iso -boot d -m 512 - Unmount ISO: sudo umount ~/livecdtmp/mnt
- Burn and perform real-life test
Installing Xfce desktop on bare Ubuntu
sudo apt-get install xubuntu-desktop
Checking what files a program requires
strace myprogram
ltrace myprogram
ldd myprogram
lsof
How to make a live USB persistent?
Creating a live USB ISO file from a running system
Q&A
How to update a host?
You should run "apt-get update" regularly to update the local cache of the list of applications available in depots listed in /etc/apt.sources.list.
If using "aptitude" instead of "apt-get", note that "aptitute upgrade" and ""aptitude dist-upgrade" are deprecated, and should be replaced with "aptitude safe-upgrade" and "aptitude full-upgrade", respectively.
Note: It's not a good idea to mix "aptitude" and "apt-get". It is recommended to stick to one of the commandes (apt-get is recommande in Ubuntu, while aptitude is recommended under Debian).
Resources
- (Ubuntu community) Boot from USB
- (Ubuntu community) Installation from USB stick
- (Ubuntu community) How to Customise the Ubuntu Desktop CD
- Pendrive Linux
- Ubuntu Customization Kit (UCK)
- How-To: Customize your Ubuntu Live CD
- Kernel Compile
- Kernel Custom Build
- Inside the Linux boot process by M. Tim Jones
http://forum.xubuntu-fr.org/
http://ubuntuforums.org/
https://help.ubuntu.com/community/Installation/FromCForUSBStick
https://help.ubuntu.com/community/LiveCDCustomizationFromScratch
- Free DotNet VersionCheck and Speccy (Windows utilities to check what hardware/software users have. Useful to check what key to hit to boot from USB or CD)
- "UNetbootin allows you to create bootable Live USB drives for Ubuntu, Fedora, and other Linux distributions without burning a CD. It runs on both Windows and Linux"